Understanding Disc Golf Footing & the X-Step
Distance is mostly a footwork problem. That’s a hard thing to hear when you’ve spent months working on your grip or your follow-through or the angle of your release, but it’s true more often than people want to admit. The X-step is the foundation that everything else in a full-power throw is built on, and most recreational players are either skipping it entirely or doing a version of it that actively costs them yards without knowing why.
Here’s the good news. The mechanics aren’t complicated. They just require slowing down long enough to understand what each part of the movement is supposed to do before you start asking it to do it at full speed.
What the X-Step Actually Is
The X-step is an approach footwork pattern that loads your hips before the throw, transferring your body’s momentum into the disc rather than fighting against it. The name comes from the visual shape your feet make as they cross: the feet step past each other in an X formation during the approach, which rotates the hips backward and coils them like a spring before release.
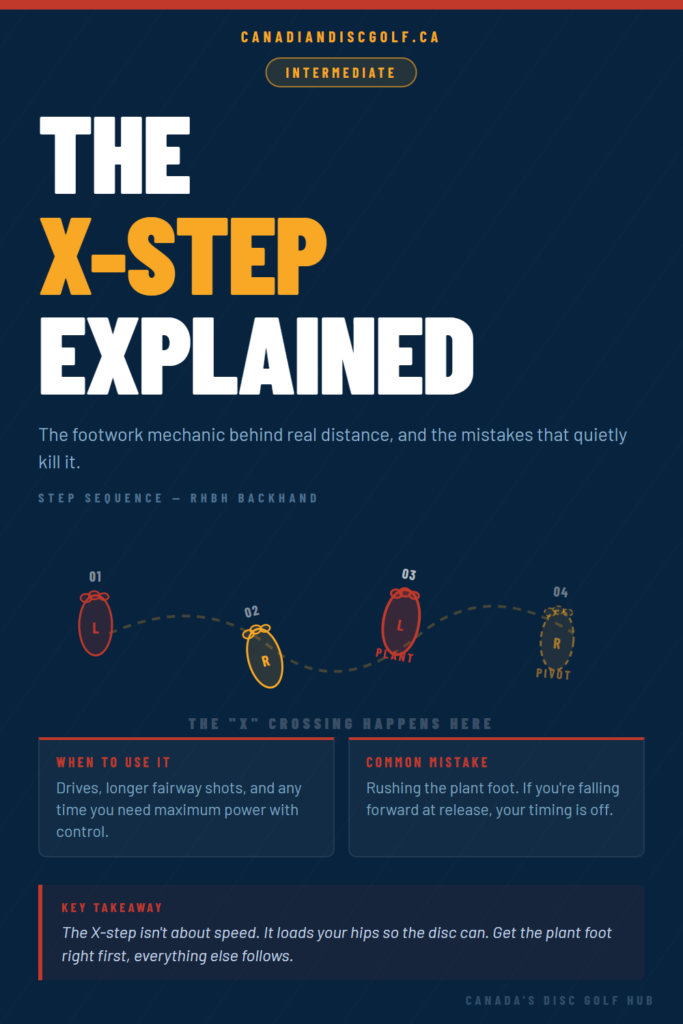
For a right-hand backhand thrower (RHBH), the basic sequence moves like this. You approach the tee on a walk-up, starting with your left foot. The right foot then crosses behind and slightly to the left of the left foot (this is the X crossing). The left foot plants, firmly, perpendicular to your throwing line. That plant is your pivot point and your power transfer moment. The right foot follows through as you rotate into the throw and finish facing the target.
Four steps. The crossing action, the plant, the throw, the finish. On paper it sounds like any other walking motion. In practice, getting each element right at the same time, at full throwing speed, takes real repetition.
Why It Generates Power
Think about it like a slingshot. If you just grab the band and push it forward, you get almost nothing. The power comes from pulling it back first. The X-step’s crossing motion pulls your hips backward relative to your throwing shoulder, creating rotational tension across your torso. When you release that tension through the throw, it drives the disc through the power pocket with real velocity.
This is also why your driver might not be going as far as you expect even if your arm feels strong. Without proper hip loading from the footwork, you’re throwing almost entirely with your arm and shoulder, which is much weaker than a full-body rotational throw. Players who switch from a run-up or a standing throw to a properly executed X-step often pick up twenty to forty feet of distance without changing anything else. The disc doesn’t know how hard you tried. It knows how much rotational energy transferred into it at release.
The Plant Foot: Where Most People Lose It
If there’s one piece of the X-step that separates players who get it from players who don’t, it’s the plant foot. Step three. The left foot (for RHBH) hitting the ground at the right angle, at the right moment, with enough weight to serve as a stable pivot point for everything that comes after.
The most common mistake is a soft or rushed plant. You step into it too quickly, your weight is still moving forward, and instead of pivoting around a fixed point, your whole body continues to drift toward the target during the throw. The result is a weak, high release that often turns over, or a throw with no snap that fades out well short of where it should. You might feel like you threw hard. You probably did. But hard doesn’t equal far if the energy has nowhere to go.
The plant foot should hit the ground angled at roughly ninety degrees to your target line, heel down, with your weight loading into it just before the disc starts moving forward. Not after. That sequencing, weight into the plant foot, then the disc follows, is what creates the rotational whip. Get the sequence reversed and the power bleeds out early.
The Other Common Mistake: Leading with the Arm
Tied for the most damaging error is what coaches sometimes call “arm-leading,” where the throwing arm starts the motion before the hips have finished rotating. The upper body outruns the lower body, the kinetic chain breaks, and you end up muscling the disc with your shoulder rather than whipping it through with hip rotation.
A useful mental cue here is to think of the throw as starting from your back heel, not your hand. Your rear hip initiates the rotation, your chest follows, your shoulder follows that, your elbow leads the arm through, and the disc comes last. If you can keep that sequence intact at half speed and feel each part activating in order, you’ll start to understand what a clean throw actually feels like in the body, which makes it much easier to notice when something breaks down.
When to Use It, and When Not To
The X-step is for drives and longer fairway shots where you want maximum distance with reasonable control. It’s not the right tool for every situation on the course. Approach shots inside thirty metres rarely benefit from a full X-step, and there’s a real argument for a simplified, shorter approach or even a stand-still throw for any shot where placement precision matters more than distance.
The forehand throw is its own thing worth noting here. The mechanics of throwing a forehand involve a different hip engagement and a different plant position than the backhand X-step. Players who try to copy their backhand footwork onto a sidearm throw usually end up off-balance or with a release that’s aimed at the trees to their right. Both throws benefit from loaded hips, but how you get there differs enough that they need to be practiced separately.
Also worth thinking about: wooded courses with tight tee pads sometimes don’t give you room for a full four-step approach. Learning a shortened two-step version of the X-step is genuinely useful for Canadian courses where the bush crowds the tee, because you still get some hip loading without requiring a full runway.
How to Actually Practice It
The worst way to learn the X-step is to just go to the field and throw full-speed drivers until something feels right. You’ll reinforce bad patterns faster than good ones because your brain defaults to whatever produces immediate distance, even if that thing is technically wrong.
Start without a disc. Walk through the step sequence slowly, focusing only on where your feet land and how your hips feel at each stage. Do this ten times. Now add the arm motion, still no disc, still slow. You’re wiring the sequence at a pace where you can actually feel what’s happening. Try to feel the tension across your torso during the crossing step. Notice whether your plant foot is hitting the ground before or after your shoulder starts moving.
Once the slow version feels connected, grab a mid-range, not a driver. Mid-ranges are more forgiving of timing errors, and you’ll get better feedback on what worked and what didn’t from the flight. Throw at a comfortable target at about seventy percent effort. Watch the flight. A clean X-step and a good release should produce a predictable, straight-to-fading flight with real glide. If the disc is turning over hard or diving left immediately, something in the sequence is breaking down, and you’re better off troubleshooting it at lower speed than trying to power through it.
Build up to full effort over several sessions, not several throws.
The Bigger Picture
Here’s the thing about footwork that most tips posts won’t say directly: getting the X-step right doesn’t just add distance. It makes the entire throw feel easier. A properly loaded throw requires less perceived effort because you’re using your whole body instead of just your arm. After a round where every drive was arm-heavy, you feel it in your shoulder. After a round where the footwork was right, you mostly feel it in your legs and your core. That’s the right kind of tired.
The X-step is not a magic trick, and it doesn’t replace the need for a solid grip, a clean release, or good disc selection. But it is the platform that everything else stands on. Get it right and you’ve got a base to build from. Skip it and you’re always working against the physics of your own throw.